Thursday, June 6, 2013

Game Development Design Patterns

Some game development-centric design patterns, with examples of usage.
I came across these recently, and wanted to record them for my own purposes at a later time. I'd really like to expand on them, perhaps even write a treatise on their implementation in a real-world situation game engine. But for now, they can collect virtual dust here.
  • Builder: set up component-based entity one component at a time, based on data
  • Factory Method: create NPCs or GUI widgets based on a string read from a file
  • Prototype: store one generic 'Elf' character with initial properties and create Elf instances by cloning it.
  • Singletonthis space deliberately left blank.
  • Adapter: incorporate an optional 3rd party library by wrapping it in a layer that looks like your existing code. Very useful with DLLs.
  • Composite: make a scene graph of renderable objects, or make a GUI out of a tree of Widgets
  • Facade: simplify complex 3rd party libraries by providing a simpler interface to make your life easier later.
  • Flyweight: store the shared aspects of an NPC (eg. models, textures, animations) separately from the individual aspects (eg. position, health) in a mostly transparent way
  • Proxy: Create small classes on a client that represent larger, more complex classes on a server, and forward requests via the network.
  • Chain of responsibility: handle input as a chain of handlers, eg. global keys (eg. for screen shots), then the GUI (eg. in case a text box is focused or a menu is up), then the game (eg. for moving a character)
  • Command: encapsulate game functionality as commands which can be typed into a console, stored and replayed, or even scripted to help test the game
  • Mediator: implement game entities as a small mediator class that operates on different components (eg. reading from the health component in order to pass the data to the AI component)
  • Observer: have the renderable representation of a character listen to events from the logical representation, in order to change the visual presentation when necessary without the game logic needing to know anything about rendering code
  • State: store NPC AI as one of several states, eg. Attacking, Wandering, Fleeing. Each can have its own update() method and whatever other data it needs (eg. storing which character it is attacking or fleeing from, the area in which it is wandering, etc.)
  • Strategy: switch between different heuristics for your A* search, depending on what sort of terrain you're in, or perhaps even to use the same A* framework to do both pathfinding and more generic planning
  • Template method: set up a generic 'combat' routine, with various hook functions to handle each step, eg. decrement ammo, calculate hit chance, resolve hit or miss, calculate damage, and each type of attack skill will implement the methods in their own specific way
Blogged without permission from http://gamedev.stackexchange.com/a/4161/23707

Sunday, April 14, 2013

Do-It-Yourself Rain Barrels

Adapting the Down-Spout
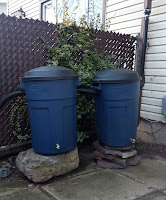
Gardening season is around the corner. So are high water utility bills, if you're not careful. With a bit of craft, a few tools, and some perseverance, it's possible to construct your own rain harvesting containers. Ideally I'd have purchased wine barrels from somewhere, but this wasn't feasible due to time and price constraints I placed on this endeavour. I'd read various tutorials and seen various videos around the web, and got some advice from one of the guys at Rona who'd made his own rain barrels, and came up with my own system which suited my needs.

I set out to construct two rain barrels. They are fitted with intake and overflow holes, a spigot which fits a standard garden-hose, and are designed in such a way that I can add more as needed.

The easiest part was assembling the barrels; three cuts, fit the spigot, apply water sealant, and they're done.

The First Intake
The hardest parts were twofold: locating the appropriate materials, and finding something which would fit the drainpipe coming from the roof gutters. I bought the garbage cans and spigots at Canadian Tire, the hose at Home Depot, and the drainpipe fittings at Rona.

In retrospect, I should have done all my shopping at Rona, if only for the reason that most (84%, according to them) of their wares come from Canadian suppliers (whether they're actually constructed in Canada is another matter, however...)

But I digress.

Materials

The First Overflow to the Second Intake
First, the bill of materials. This is per-barrel, but you only need enough hose as to get your water-flow from the drainpipe to your first barrel's intake, from each barrel to the next (if you're building more than one barrel), and from the last barrel's overflow to your run-off point.

  • one "barrel" - I used (roughly) 100L Rubbermaid Roughneck garbage can. ($20)
  • 25' of 1-1/2" ribbed plastic hose - I used sump-pump hose ($15)
  • a 3/4" spigot - I used brass; it will be submerged in water most of the time, and brass doesn't rust ($8)
  • a nut to thread the spigot from inside the barrel - again, I used brass. ($2 each -- they came in a pack of two for $4)
  • a rubber pipe adapter - I used a 3"-to-2" adapter, and closed it tightly around the first barrel's round intake and the gutter's square down-spout. ($10. though you only need one of these, unless you have more than one down-spout you want to divert).
  • The Second Overflow
  • supports - I had a big-ass stone in my yard which would form one support, and a pile of flagstones I used for another support. ($0)
In total, per-barrel, the cost is $45, plus the down-spout adapter (one-time fee of $10). I did want to use brass washers (this would have required two per barrel) to provide added support for the spigot, but neither Canadian Tire, Rona nor Home Depot carried 3/4" brass washers, so I did without. While not necessary, they (along with the silicon caulking) would have formed a better sort of flange than the caulking by itself.

Tools

Leading Off the Overflow Pipe
The tools I had to buy were few, since I already had a drill and various other standard tools (disassembling the down-spout required a Robertson screwdriver, the pipe adapter required a flat-head screwdriver to tighten, pliers were necessary to secure the plastic hose into the intake and overflow holes). I had to buy:
  • a caulking gun ($6)
  • caulking caps ($4, came with two in the package)
  • clear silicon caulking ($4)
  • a 1-3/4" hole-saw ($6)
  • a 3/4" spade drill bit ($8)
In total, I spent around $30 for tools.

Assembly

The assembly process is simple:
The First Barrel's Spigot
  1. Using the hole-saw, cut one hole on either side of the barrel near the top. The Roughnecks I bought had flat sides underneath the handles, so I made the cuts there. These will form the intake and overflow holes.
  2. Using the spade drill-bit, cut one hole on the side of the barrel near the bottom (positioned evenly between the intake and overflow holes). This will be used for the spigot.
  3. Fit the spigot through the bottom-hole, and while twisting it into place, squeeze a bit of caulking over its thread. This will form a sealed bond as it goes into the barrel.
  4. Place more caulking around the spigot on the inside of the barrel, and spread it around the thread, forming a seal. (Note: caulking is messy, nasty stuff. Your hands should be protected when using it, and you should be working in a well-ventilated area. Acetic acid is not good for you.)
  5. Thread the nut on the inside of the barrel. It should be at least finger-tight.
  6. To both sides of the spigot, apply enough caulking that you're satisfied that a decent waterproof seal will form.
  7. Let the caulking dry according to the directions on its packaging. Mine asked for 12 hours; I let it sit overnight.
  8. Test the water-seal. Fill each barrel up with enough water to test that there is no leakage coming from the spigot, and that the spigots themselves are working enough to your satisfaction.
  9. Rinse each barrel out well.
You're done!

The Second Barrel's Spigot
Installation
  1. Set up one support per barrel nearby your down-spout.
  2. Detach the down-spout at an appropriate height which is higher than the intake hole of your barrel.
  3. Connect the large end of the rubber pipe adapter to the down-spout, and tighten.
  4. Connect the small end of the rubber pipe adapter to the intake plastic hose, and tighten.
  5. Cut the hose to a length such that it will reach the first barrel intake hole.
  6. Fit the hose into the intake hole.
  7. (optional) Cut hose for each additional barrel, and connect the overflow hole of each barrel to the intake hole of the barrel to follow it in the series.
  8. Connect the remaining hose to the overflow hole of the last barrel, straighten it out, and place its end where you want run-off to lead.
  9. (optional) Seal the inside and outside of each intake and overflow hole with more silicon caulking. I didn't do this for my own rainwater harvesting system, but I very well may before it's too late. :-)
You're done!

The Rainwater Harvesting System
Various Notes
  • Your mileage will vary. Each down-spout will be different, and you will likely need to think of a suitable solution for your own situation. Consult with the kindly folks at your local neighbourhood hardware store. They are a resource; use them!
  • Use dark containers. Light containers are more likely to let in sunlight, which can cause algae to form inside your barrels.
  • Use containers whose lids seal well when closed. Mosquitoes breed in stagnant water, and unless you don't mind an army of the little bastards swarming you and feasting on you in a blood-orgy, make sure the barrel lids are on tight.
  • Consider mass. Water has a mass of 1kg per litre; the barrels above will have a mass of almost 100kg when full. Since you must raise your barrels up (before they fill up!), make sure their supports will actually support them. Milk crates are bad, bricks and stones are good.
  • Consider fitting a filter before the first intake. Twigs, bugs, leaves, and dead rotten squirrels don't make for good things to have in your water supply. A simple piece of screen that you'd use on a screen door would suffice to filter the nasty stuff out, and is easy enough to clean/replace.
I hope you enjoyed my little treatise; I'd like to hear any comments folks have on the subject.

Saturday, March 30, 2013

How to Bathe the Cat


How to Bathe the Cat

  1. Thoroughly clean the toilet. 
  2. Add the required amount of shampoo to the toilet water and have both lids lifted. 
  3. Obtain the cat and soothe him while you carry him towards the bathroom. 
  4. In one smooth movement, put the cat in the toilet and close both lids (you may need to stand on the lid so that he cannot escape). CAUTION: Do not get any part of your body too close to the edge, as his paws will be reaching out for anything they can find. The cat will self-agitate and make ample suds. Never mind the noises that come from your toilet, the cat is actually enjoying this. 
  5. Flush the toilet three or four times. This provides a "power wash and rinse" which I found to be quite effective. 
  6. Have someone open the door to the outside and ensure that there are no people between the toilet and the outside door. 
  7. Stand behind the toilet as far as you can and quickly lift both lids. 
  8. The now-clean cat will rocket out of the toilet and run outside where he will dry himself. 

Sincerely,
The Dog

Friday, March 29, 2013

Using Chrome Developer Tools to Debug node.js Applications

1. Install node.js
Visit http://nodejs.org/, download and install for your platform.

2. Install node-inspector
npm install node-inspector

Tip: "npm" is the node.js package manager; its path is added to the environment upon installation.

3. Write a script to be debugged, save as .js
Sample script:

// Script start
var APP_PORT = 8080;
var http = require('http');

var server = http.createServer(function(request, response) {
  response.writeHead(200);
  response.end('Hello, world!');
});
server.listen(APP_PORT, function(){
  console.log("Listening on http://localhost:" + APP_PORT);
});
// Script end

4. Start the node server in debugging mode; this will enable the debugger ("DEBUG_PORT") on port 5858
node --debug path/to/your/script.js

Tip: "node" is the core node.js server; its path is added to the environment upon installation.

5. Connect node-inspector to the node server, specifying a port ("INSPECT_PORT")
node-inspector --web-port=8989

Tip: Use "netstat -a -o" to see what ports are in use, before assigning INSPECT_PORT.

This puts three (3) ports into use:
APP_PORT (8080) - the port used by the application to respond to web requests.
DEBUG_PORT (5858) - the port used by node.js to serve up debugging requests.
INSPECT_PORT (8989) - the port used by node-inspector to relay requests to node.js' debugger.

6. Connect Chrome locally to the port served by node-inspector.

    http://127.0.0.1:INSPECT_PORT/debug?port=DEBUG_PORT

Once loaded, you'll get access to Chrome Developer Tools' Scripts and Console tabs, enabling you to breakpoint and inspect executing code, as well as view console output.

Tuesday, March 19, 2013

Paste

Why can't I paste something from my brain onto the screen? I know it's there.

And seriously, my clipboard is very temporary...

Sunday, March 17, 2013

Worst. Gluten-Free Hippie Bread. Evar.

In the past, I've made some pretty kick-ass bread. It always uses gluten-rich white flour, the yeast is always activated with white sugar, and it always comes out pretty freakin' awesome.

However...

I had a good reason to try my hand at making a gluten-free, low glycemic-index bread. So with Pumpkin Princess in-hand, we headed over to the local Bulk Barn for supplies.

The GF Supplies

We waltzed up and down the aisles while looking for two things: gluten-free all-purpose (GFAP) flour, and Xanthan (or Guar) Gum.

I found the GFAP flour easily enough. I decided that it must be the "right" flour to get, as when I opened the bin lid, the flour was nearly depleted. Pumpkin Princess graciously scooped in what looked like 5 cups of the stuff at my direction, then we headed off to find some Xanthan (or Guar) Gum.

Not finding what I was looking for, I asked a friendly BB employee for some assistance, and she was able to point me in the right direction. I found Xanthan (and Guar) Gum, and compared their prices.

After picking my jaw up off the floor, I opted to buy the $6 Guar Gum, and left the $13 Xanthan Gum on the shelf.

The GI Supplies

Since the Cambridge Farmer's Market outdoor section has been closed since November, I haven't had the opportunity to relieve Doug the Beekeeper of some of his supply of raw honey. So yesterday, I headed to the Stratford Farmer's Market with a remarkable new friend of mine. I had an amazing time, and when I arrived home, I was armed with some Bauman raw honey.

Off To A Good Start

I fired up my foolproof, successful-many-times-over white bread recipe, and started aligning its existing ingredients (water, white AP flour, white sugar, yeast, oil, and salt) with what I would consider a healthier GI/GF bread. After I'd figured out the measurements for things, I assembled the Usual Suspects, and began.

The usual suspects. (I forgot to include the salt and olive oil in this photo, but come on, everyone has salt and olive oil. It's just not cool.)

First, add some hot tap water to the bowl.

Here's where we get Vegan-y, adding the raw honey to the mix. Swirling the spoon around causes the honey to dissolve into the hot water, readying it for the yeast feast.

The yeast. Fleischmann's is pretty much my go-to yeast. Because, yeah, I have a go-to yeast.

Here, the yeast bacteria begin to grow as they eat the sugars in the honey.

Eat, my pretties.

Eat....

EAT! 
Going Full-Hippie

This is the heart of the hippie bread. The GFAP flour. It contains (according to BB's website) a mix of flours made from garbanzo beans, potato starch, tapioca, white sorghum, fava beans, and a fine Chianti.

Here, I suspensefully add the GFAP flour for premixing with the gum...

...and the Guar Gum. (At this point, I wonder if the Xanthan Gum would have been a better choice?)

See? Guar Gum.

Pour the nasty-looking yeast mix into the crater I made in the flour.

Adding the uncool olive oil and salt. Hell, I didn't even bother to photograph the salt. Screw that salt.

Here, I begin to suspect that things are as they never were before.

I prepare the death-grip into the nasty, sticky mess that is the bread dough...

...and immediately begin wishing I had a big ol' Kitchenaid mixing bowl apparatus.

The bread-turd that I happened to find after mixing everything around and "kneading" it. (Note; kneading generally does not cause your flour to crack and break apart. In this case, every time I kneaded, the dough cracked and came apart. At this point, I knew this bread was going to suck badly.)

Things Start To Go Wrong

The "bread" dough, in all its Play Doh-consistency, twelve-pound glory.

It's laughing at me. It knows it is a failure, and is projecting its misery upon me. Disgusted, I cover it with a dish towel, and leave it in the sun to die.

What a freakin' mess. (Oh, look! The salt!)

Here, the dough has mutated into a hippie-flavored ball at least 1.1x its original size, and 300x its mass.

A close-up of the ball of dough. It's still laughing. 

Having had enough of its tripe, I punch it with all the fury of a disappointed baker.

After sitting in the sun again, it has metamorphosed into a sentient mass of ... dough?

I turn the "dough" out onto the table. Funny, from this angle, it looks like the moon. And oddly enough, it has the moon's mass.

Granny's bread-pans. If anything can save this gong-show of a baking session, they can!
I divide the dough in twain, dump each piece into its tin...

...and leave them in the sun once again.

After baking at 425F for 30 minutes, I have come to the conclusion that this project is a dismal failure.

The artsy angle.

Notice how the bread crumbles when pressure is applied with a knife.

This slice of bread tasted like chick peas, had absolutely no texture,  smelled disgusting, and weighed the same amount as the sum of all human apathy.


I'm not giving up, however. I'm not exactly sure what went wrong, but if I had to identify two things that likely went wrong, I would say:

  1. I chose the wrong flour. This flour tasted like crap warmed over (literally), and did not lend well to a baked bread.
  2. I should have splurged on the Guar Gum. The way this bread cracked and broke up, it should have been made with a more gluey hydrocolloid.
Well, that's it. I hope this was as entertaining as it was fail.

Tuesday, March 12, 2013

Sometimes

Sometimes, when I find that perfect spot while lying in bed, I wish I could switch the lights off using sheer willpower, rather than having to get up, never to find that perfect spot again.

Screw you, Jedi Knights.